Sienci Labs will be closed on Friday, April 3 for Easter weekend. Customer Support services will not be available. Orders can be placed as usual. Please use our online resources and help videos until the team is back on Monday, April 6. Dismiss
One of the things that I admire about Ed is his focus, commitment, and passion for delving into the technical side of the things that he does, and the LongMill was no exception. Please meet Ed, our second beta tester for the LongMill MK2.
About the beta testing program
Just as a quick intro about the beta testing program, at the end of last year, we recruited three different people of different backgrounds and skill levels in our area to test the LongMill MK2. At this point, we were at the final stages of our development for the MK2 and were looking to iron out the rest of the kinks to finalize the production of a few of the parts. All beta testers paid for their machines, albeit with a small discount. Each beta tester volunteered their time and space to observe and interview them at each step of the process as well as testing prototype and production parts as they were made to update their machines.
Working with Ed
It was fantastic to work with Ed in the beta testing program. Especially during the early stages of testing, he provided us with lots of thoughts and feedback on the engineering design, especially in terms of improving the accuracy of the machine with regard to the process of setting it up and assembling.
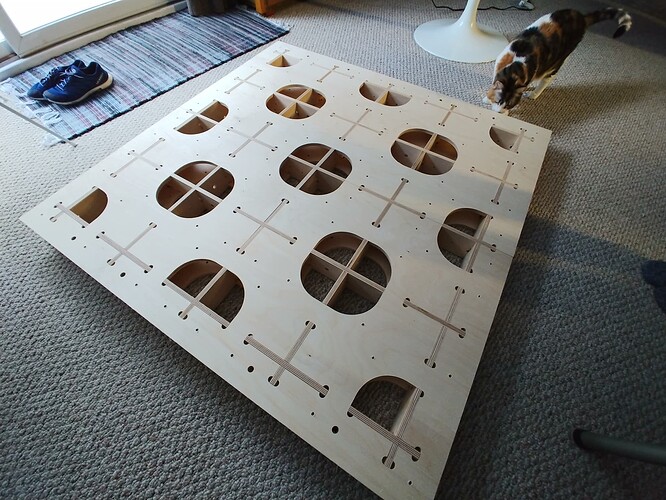
Did this project in Fusion 360, which I personally consider one of the most advanced hobby CNC software available
This project also includes tiling, which is also a fairly advanced technique, especially because it requires a lot of thought to position the material when the dimensions of each component matter.
Requires parts to slot together accurately, and to do that, Ed took the time to make dozens of test boards to find the perfect fit, each marked down with the measurement, settings, and bit size.
Made all of the parts with the machine supported by rickety saw horses, not a stable base as we typically recommend our customers to use.
This project gave some additional perspective on the limitations and possibilities of how accurate the machine can be, and what sort of things we can do to improve the accuracy overall, especially for technically challenging projects.
It is wonderful to continue to see Ed work on technically challenging projects and see how capable the LongMill can be in the hands of someone so technically capable. I also admire his drive to jump straight into the deep end in terms of what a CNC machine can do and come out with some amazing projects and knowledge to share. If you want to see some of his other projects, make sure to check them out on the Forum.
May has been a pretty rough month, dealing with some QA issues and other manufacturing delays. Overall, we’ve been able to keep time to ship to time to order for LongMills down to about 1-2 weeks for most customers at this current time, but we’ve faced some challenges in keeping production moving smoothly.
This is our June 2022 production update. We’ll touch on some news from May and talk about stuff to expect in June.
Visiting Andy McTaggart, one of our beta testers
Current lead times
Lead times currently are 1-2 weeks on MK 12×30 and 30×30. Our lead time is mostly affected by when our newest batch of Y gantries will arrive. We are expecting them to be ready for coating by Thursday and come back to us at the start of next week.
*UPDATE Jun 3, 2022* Our new batch of Y gantries have arrived today and have passed QA inspection! We are packing up machines now to ship and should have things continue to go out!
Our mini-saga of Y gantries
About two months ago when we first started manufacturing the new batch of 1000 Y gantries, our manufacturer jumped the gun and started producing new plates before we provided the new revision of plates. Due to this, we needed to recut another 1000 Y gantries with the new revision and keep the old version in storage for use in the future potentially. Because there were already quite a few other parts getting processed at the time, the overall time for us to get the materials down to the coating shop was unaffected.
It took another week and a half to get everything coated, but just as the finished parts were loaded up onto the truck, the pallet fell, causing many of the plates to get damaged. We received a partial order of undamaged parts (X gantries, Z gantries, front and back feet, and controller box parts), but unfortunately, all of the Y gantries were damaged and needed to be fixed.
In the meantime, we continued to fulfill orders with the remaining number of gantries we had on hand. However, at the current time of writing, we are out of Y gantries.
About a week later, we received the fixed Y gantries, but then we ran into another issue.
We had changed to a new process of drilling and tapping holes, which referenced the center bearing hole to cut some of the smaller holes on the plate. Previously, we were laser cutting all of the holes, but we switched to the CNC method to speed up the process and automate the tapping process.
Although we are investigating the incident, it we suspect that the workholding was not done correctly on this batch of parts, causing all of the holes to be slightly off from where they need to be.
Initially, we did find that 1/3rd of the plates had the holes in the correct place, but after doing further checking we found that the tapping angle of the threads was also dramatically off, and none of the plates were able to be used.
Thankfully, our manufacturer which we’ve worked with for the last 6 years has been working hard with us to rectify the issue and implement new processes to eliminate this issue in the future. We’ve also sent a few of the members from our manufacturing team to set up another tapping cart and make a new batch of gantries as quickly as possible. At the time of writing, I’ve been informed that we’ve just finished 500 Y-gantry plates and will be shipping them to be coated on Thursday.
We’re currently working with our coating manufacturer to get this batch of parts to get coated as soon as possible and are looking at sometime next week when we’ll be able to get them.
Of course, to add to the issues for this month, the second batch of repaired driver boards for the laser still has issues. We are waiting on another batch of drivers from another manufacturer that should be arriving this week.
48×30 MK2s and Extension Kits
We have now started packing and prepping the parts for the MK2 48×30 machines and the Extension Kits. We are waiting on the production for the wiring and Y gantries to be done over the next couple of weeks, but progress on those is moving along on time and we are still on track to ship in July.
Parts that are being processed currently include:
Extended X rails
Couplers
Lead screws
Drag chains
ACME locking nuts
Delrin nuts
Bearings
Parts to start packing include:
MK1 to T12 Delrin nut adapter
Wiring management parts
Wires
Y gantries
At the current time, we starting packing and processing the new kits. Once we get the wiring and Y gantries we’ll have full kits ready to go. Here are our rough estimated delivery times:
Y gantries: 3rd week of June
Wiring: 2nd week of June
Although production of these parts is coming along fairly smoothly so far, I am currently expecting the resources for the assembly to be one big hurdle to get through and may make a big impact on the timing of shipments. Of course, we don’t want to delay shipments, but we also don’t want to hand the product over to the customer without proper instructions on using it. We will put out more updates on the timing of shipments as we continue to develop the resources for the 48×30 machines.
So far, our beta testers have been using the extended version of their LongMills with lots of success. If you want to see Dana, who’s had his extension kit for testing for the last little bit, check out the video below:
Wrapping up the beta testing program
We just finished filming our last beta tester’s interview this past weekend. It’s been such a great journey to follow along with each user to see how they grow and learn to use their machines.
Our last beta tester interview will be posted in about 1 week from now.
If you want to see the interviews, please check our playlist here:
Hey everyone, the assembly videos for the LongMill MK2 are now live on our Youtube channel. To watch the videos, please visit our Youtube playlist. These assembly videos provide just shy of 5 hours of viewing content, which goes through the nuances of assembling your machine.
Of course, if you get tired of Chris’ commentary, we have an excellent instruction manual as well.
A few weeks ago, Leandro, Scott, and I went over to visit Dale and interview him about his experience with the LongMill. It was a fantastic and fun trip for all of us, especially spending time with a fun character like Dale. Here’s our interview!
About the beta testing program
Just as a quick intro about the beta testing program, at the end of last year, we recruited three different people of different backgrounds and skill levels in our area to test the LongMill MK2. At this point, we were at the final stages of our development for the MK2 and were looking to iron out the rest of the kinks to finalize the production of a few of the parts. All beta testers paid for their machines, albeit with a small discount. Each beta tester volunteered their time and space to observe and interview them at each step of the process as well as testing prototype and production parts as they were made to update their machines.
Working with Dale
It has been so fun to work with Dale. Just as a background, we would consider Dale a “superuser”. Dale initially had the LongMill MK1 in his shop that was used regularly for his side business. You might also recognize him as a very helpful and active member of our Facebook Group as well.
Because we knew how much he was using his MK1 and how long and intricate many of his projects were, we knew that Dale would really put the MK2 through its paces. And this happened to be true, especially as he took this opportunity to transition from working a job for someone else and transitioning to working full time for himself.
As someone who’s more focused on building, engineering, and selling CNC machines, it’s really satisfying to meet people like Dale who’ve gone from working a regular 9-5 and being able to work for themselves and express their creativity in their craft using our machines.
Dale is now also beta testing the extension kit on his original MK1 machine. We’re looking forward to all the new creations that’ll be coming down his pipleline!
A common query we get here at Sienci Labs is “What should I order with my LongMill?”. We’ve created a new step-by-step configurator to help customers figure out what they should be ordering with the LongMill. The LongMill MK2 Configurator covers all of the add-ons and toolings that we feel are relevant for someone getting set up with a new machine, as well as providing better info and transparency of what each item does.
Why this matters to us
One of the interesting results of being in control of how the order page looks on our website is that it influences the purchasing decisions of our customers and changes what is and isn’t easily visible to the customer. The consequence of this is that most of our customers purchase all of the add-ons we have on the product page, even though some of these items may not be needed for most beginners.
For example, we typically do not recommend beginner users to use or install inductive sensors until they have gained some experience using the machine. For the dust shield, we also don’t feel it is required for most customers. However, more than 50% of customers choose these options as default. Although it means more money in our pocket at the end of the day, we would prefer customers to be able to purchase the things they need and have the best experience possible.
Another result of this layout is that there are some confusion and order changes that happen, as we don’t list all of our add-ons on the product page. For example, we have our regular touch plate on the list, but not our AutoZero touch plate. Many customers have ended up getting in touch with us to change their regular touch plate to the AutoZero touch plate. With an improved system like the configurator, we can lay out more options and give people the opportunity to compare their options more easily, as well as reduce the overall clutter of the page.
We’re hoping that this improves overall customer and ordering experience, while better informing customers on what they need with their machine.
Depending on the reception of the configurator, we may implement it on other products, like the LaserBeam and LongMill Extension kits. If you have any thoughts or feedback, feel free to reach out and let us know!
Hey everyone, here’s our May 2022 production update.
Overall production continues to move along smoothly and machines are going out the door at a good pace. In a good way, we don’t have too much to report on.
Lead times for LongMill MK2 12×30 and 30×30 orders
We’re excited to be getting through the rest of the queue on the LongMill MK2 12×30 and 30×30 orders sooner than expected. Patrik and the rest of the packing crew have now pushed out over 400 machines over the last four weeks, and are expecting to complete the rest of the queue sometime next week. This means that new orders should ship in 2-3 weeks placed today.
Incoming materials and production
Production has been moving along slowly without part shortages. Once the queue is complete, we are expecting to have enough parts to pre-pack and ship another 70 machines with the gantries and steel parts that we currently have. Another batch of these parts is expected to arrive in about 2 weeks, so we believe that we’ll be able to continue packing and shipping as orders come. After these parts arrive, we’ll have plenty of material to keep us busy for the next 2-3 months.
It’s been a while since this has happened, but we’re now at the point where our production capacity is exceeding our demand, and our goal is to get things packed up and ready to go as more folks get their machines and word on the LongMill MK2 continues to spread.
Some other general news
Our company is growing. We have a couple of new people joining our team in marketing, operations, and engineering! We’re also working on hiring new folks for software development and customer support.
The LongMill MK2 assembly video is being edited now and we are expecting it to go live in the next week or two.
Hey everyone, just wanted to let everyone know that the completed order emails with the tracking information issue from last week have been resolved and the site is operating as normal. Customers should now continue to be getting emails with their tracking numbers as their orders are complete and shipped.
If you had an order during this time period, we sent the tracking order manually as they were shipped. If you didn’t get one, please feel free to contact us. You can check if your order has been shipped and where it is in the queue with our Order Status page.
Customers with order numbers 39363 and higher, or orders placed after April 28th, should see the tracking numbers emailed as normal automatically.
Thank you everyone for their patience, we’re glad this has now been resolved.
So what happened exactly
It appears that starting from April 14th, completed order emails for some orders (specifically for the ones that are for LongMill MK2s) were not being sent. We were not aware of the issue until we returned from our long Easter weekend. Our current system has been set up to send emails in several different stages:
When we receive your order: an email is sent to the customer when the order has been created and successfully paid for. If there is an issue with your payment you will get a different email to notify you.
When we complete and ship your order: an email is sent when the order is ready for pick up (which comes with instructions and times that your order can be picked up) or has been shipped (which comes with tracking info as well as additional info about duties and taxes).
In some cases, there may be additional emails, such as for software licenses and if we need to notify you of packing status.
At first, we checked the status of different plugins of the site, as updates were done on different areas to see if there were any changes to the site between the 14th and 18th. However, there were no changes to the plugins during this time, and reverting back to older versions of the plugins for testing did not fix the issue.
First, we received some error notifications from the site, citing some issues with the software license system. However, the issue was still not fixed after testing with the system disabled and rolled back.
Next, we also started receiving error notifications in parsing code in the code used to generate the emails. At first glance, the HTML was correct and was code that had been used previously for a long time. However, we found that the PHP version was updated on April 14th, which may be causing issues with parsing HTML in this case. Removing this code has fixed this issue, and the emails are now being sent without the parsing error.
We have reverted the email to the same format as previously through another method for customizing emails, which we expect will help keep the system working in future updates.
Hey everyone, here’s just a quick update about the production here at Sienci.
By the way, we are having a livestream on Youtube tomorrow, if you’d like to be part of it, we’ll be live at noon (EST) on Friday April 22! This livestream will cover some of the development work happening at Sienci Labs as well as a bunch of stuff about the LongMill MK2.
Shipping
We’ve been working hard to get as many machines out the door as quickly as possible. Now, at the time of writing, we’ve just about shipped 250 machines. Our support team has been reporting that issues have been fairly low and comments about the machine have been overall very positive! If you’d like to follow along on our progress, feel free to check out our page here: https://sienci-upgrade3.cospark.io/order-status.
We’re expecting to keep up with packing as we are currently. Please make sure to stay tuned for more updates.
We’ve recently run into an issue (since April 18th) where shipping notifications for LongMill MK2 orders are not being sent. All other email notifications for orders (parts, bits, and other products) are being sent, and the only orders that are being impacted are the ones with LongMill MK2s. In the meantime, we are sending out the notifications manually, so please keep an eye out for them. We are continually working on fixing this issue, and if your order is showing completed on our Order Status page, please get in touch with us for the tracking info.
We suspect that there may be some bugs with the system as there was some updates that happened around this time. We’ll continue monitoring the emails being sent out so that we can keep folks updated as best as we can.
We are also experiencing some issues with auto-syncing orders with the Order Status page, so we have been updating it throughout the day. Please note that there may be a bit of delay day to day on the status of the items on the page until we fix the system.
Incoming materials
We’ve now reached the first 500 machines sold for Batch 6, which means that we are now about a third of the way through. We currently are stocking 1500 machines worth of parts, with the exception of the rails and the gantries. We initially ordered 500 sets of rails and gantries to start the batch and we’ve placed another batch of those parts to come in soon.
Materials for rails which were slated for early June arrival have been completed early and are expected to be delivered to us soon. Some will be here tomorrow and some will be here next week. This also covers the rails we need for the 48×30 machines and extension kits, which means that we’ll be starting prepping and cutting for those orders as well.
Gantry plates and feet are in production currently, and we are expecting all of them to be cut, formed, and painted at the start to middle of May. Once those parts are available, these parts will be used for machines for the next 500 units.
Initially, we were expecting to start shipping machines after the first 500 in June, but it looks like we’ll be able to chug along with production without interruptions.
I’m happy to announce that the LongMill MK2s are now shipping! We received our container last week and have started shipping since. Here’s some customer feedback from one of the first people to pick it up:
MK2 Production
At this current time, we now have enough materials on hand to ship around 500 machines. Our team continues to pack and assemble kits as quickly as we can. At the time of writing, we’ve gotten 48 machines shipped out since last Thursday.
For general updates on where your order is on the list, please see our Order Status page. An estimated time for shipping can also be found on the page. We are aiming to average around 50 machines shipped per week. Please note that this number can vary a lot depending on staff availability and production schedules. Please also note that this is an average we are shooting for, but the number may vary day-to-day, as some days we may be able to ship more than others. Because of this, we cannot provide exact dates on when machines will ship for each order, but an email will be sent the week before your order is ready to ship to let you prepare and let you know that things are heading your way.
I’ve updated the estimated time to completion on our Order Status page to reflect our expected delivery times. Please make sure to check it out for our latest estimate on when your machine will ship.
We are expecting the first week to be a little bit slower and for things to pick up as we keep packing since some of our new packing material which was designed to improve our packing speed has not arrived yet and we are using general off-the-shelf material in the meantime. The new packing material is expected to arrive this week, but it has previously been pushed back a few times and it hasn’t been clear the exact delivery date due to cardboard shortages.
Materials
We now currently have the material needed to build the next 500ish machines, which means that we have everything we need to cover all of the machines in queue currently. We are still waiting on some additional packing material to arrive, but for the time being, we’ve substituted final production packaging with some off-the-shelf materials we were able to use in the meantime.
After the first 500 units, we’ll be waiting on another batch of gantries and rails to arrive, which is expected to arrive between the end of April and the start of June. The arrival of these materials is likely to affect our lead times down the line.
Purchasing for materials for Batch 7 has also started, which should put us around August-September when we’ll start Batch 7.
LaserBeam
Power supplies and heatsinks for the LaserBeam have arrived, and we are currently packing and assembling kits. Here’s one of our staff putting together the laser and heatsinks.
We’re expecting to start shipping the kits out at the end of the week this week or the start of next week. Ikenna is waiting on Bittele to wrap up the PCB assembly to finish up the drivers on Thursday. There were some delays due to chip and parts shortages for the assembly, but the boards have started fabrication last week. We’ll have around 400 new drivers arriving to wrap up the production for the rest of the LaserBeams.
Other general updates
Chris has made a lot of progress in the assembly instructions for the MK2 machines. Make sure to check it out in the resources. Thank you Aleks for being part of this project as well!
I also wanted to share some pics of the new power supply:
You can see that when you cut it open (I used an angle grinder), it is completely encapsulated. Although this is pretty overkill, this construction will basically make the power supply impervious to dust and moisture.
Did you see our April Fools video?
Ikenna initially suggested the idea of making a lasergun using the LaserBeam. I thought that it was a great idea so I put one together.
Assembly of the Not-a-LaserGun
The Not-a-LaserGun was partially inspired also by the Not-a-Flamethrower, which was a flamethrower created by Elon Musk.
Basically, the Not-a-LaserGun takes the LaserBeam diode assembly and driver assembly and replaces the power supply with a 12V 8A battery to allow the user to use the laser on battery power. Everything was then put into a case that was 3D printed in multiple parts. An Arduino was used to generate an on-signal when the trigger is fired.
The result of this was basically a super-powerful laser pointer that can burn stuff.
Extension Kits and MK2 48x30s
We now have three people with the extension kits. Dale, Garrett, and Dana. These guys also all have MK2 machines as well, so they will be able to compare the MK1 and MK2 as well. So far, the response has been very positive, with very few issues with the overall setup. There are a few kinks to work out however which include
Proper defaults and integration on gSender
Testing and finalizing designs for wire management
Instructions and other resources for assembly and use
We’ve asked our users and testers to start extending their MK1 machines since…well this is what I said:
We also just got in the aluminum part to adapt the new T12 nuts for the T8 spacing (used on the MK1 machines).
Please keep an eye out for further development updates and other feedback!
Hey everyone, this is an update for this month’s production update, covering the status of some of the parts that we are waiting on to have come in as well as other details.
If you’re learning about the LongMill MK2 for the first time, please check out this post for more info.
We now have a definitive answer on when the power supplies we need to start shipping LaserBeams and LongMills again will be arriving to us. The container of parts and materials has been loaded onto the train this past weekend (March 19) and are expected to arrive in Brampton at the end of the week (March 25). Unloading to the warehouse can take between a few days up to two weeks. So we are conservatively estimating that the first units will start shipping at the start of April.
When will the LongMill MK2s start shipping? The saga of delayed container MAGU5348230
The last time we had a “saga” was back when we were scrambling to figure out the v-wheel situation. 2021 and 2022 shipping delays, especially for that last batch of parts have been another epic saga in itself.
Around June last year, we started Batch 5. Knowing the current world situation with COVID and everything, we started production on Batch 6 in the first quarter part of the production of Batch 5. This was the earliest we ever started sourcing parts for a batch, as we typically wait for the middle of the batch to start ordering parts. Batch 6 is also the largest batch we’ve ever created, as we wanted to hedge having part shortages by keeping more inventory on hand. With the majority of parts produced for Batch 6 being produced between August and December of last year, we expected to have a lot of buffer between each batch.
Well, then things went gangbusters from August to the start of this year, throwing our projection that we were going to run out of machines at the start of 2022 straight out the window. Instead, we ran out of LongMills sometime in December.
Given that we saw this upward trend happening, we had ordered as much stuff as we could early in advance. But there were a couple of minor issues. One of the biggest that is having repercussions now would be the chip shortage.
Due to the chip shortage, our regular suppliers for power supplies were 1) significantly increasing their prices 2) had an extremely long lead time that couldn’t deliver on schedule for our production. It was also uncertain if the power supplies could even be made, as the estimates we were getting relied on whether the chips would actually come back in stock again. With this going on, we started vetting and testing power supplies from other suppliers. For many producers, it was a similar story of very high prices and being unable to ship quickly due to the lack of chips.
Luckily we were able to work out the production for the power supplies with another manufacturer that was able to provide a high-quality product with the proper certifications and also have everything completed and ready to ship by December 1, 2021. Materials were picked up from the factory and prepped for transport on a cargo ship.
Although it was cutting it tight, we let customers know that we were expecting to start shipping LongMills in February to end of March, which would have given us just about 4 months to wait for the arrival of the power supplies. Back before the pandemic, ocean shipping speeds were fairly consistent and reliable, typically taking around 6 weeks for materials to arrive from China. Most delays, if any would generally be with loading and unloading, as sometimes things would get held up with customs or waiting for the next ship to arrive. During the pandemic, we saw shipping times shoot up to 8 weeks, and near the end of 2021, get to 12 weeks.
The estimated time that the power supplies and other parts would be arriving was January 30th initially, and we first set up our timelines based on this initial estimate. However, that has shifted due to delays in shipping. There were a couple things we believe caused these delays.
First was the aggregation of three other shipments that were getting sent here from China. We had two other shipments that were leaving from the same shipping company. We suspect that the shipper aggregated them together to save costs, rather than creating three separate shipments. Although when done properly, this does not affect the shipping time and usually is a win-win for both parties if the savings are passed onto us as well, combining shipments generally creates longer shipping times as each batch of cargo needs to wait on each other and can cause customs complications. Because of this, we never ask our shippers to combine cargo, and this was done without our consent.
Unfortunately, if we were to cancel the shipment, the time it would have taken to rebook shipments would offset any potential time savings for the shipment, so we had to go ahead with the current shipment.
Next was the trajectory of APL Vancouver, the cargo ship our stuff was on. Cargo ships can either make a straight trip from one port to another, and some will pick up and drop off cargo from multiple ports. In this case, it was the latter. Due to port congestion happening in many ports, this also added total transit time for our shipment. We weren’t aware of this until it was halfway across the ocean as well.
And lastly, general port congestion in Prince Rupert and on the rail system further delayed the shipment. According to Vanterm, the location that the container finally arrived at in Canada, there have been railcar shortages delaying containers from moving out of the rail terminal. Although our shipment arrived on Feb 13, 2022, it had been sitting waiting for rail cars to arrive for over 4 weeks.
So where does that leave us now? We now have confirmation that the shipment is now on rail and is expected to arrive on March 25th. Once the cargo arrives in Brampton, which is where the next railyard is, it will be unloaded and placed in a warehouse for pickup. Then we can arrange a truck to pick our shipment up and we’ll have everything ready to go for shipping.
Based on estimates from the shipping company, it takes roughly two days for unloading the train and two days for it to arrive at the warehouse. We are working on arrangements for a truck to go pick up the parts now so that it will be here the same day it is released.
So in regards to everything else, once we have those power supplies, we can start shipping. We have all of the other parts here to start shipping (minus some final packing materials), so we’ve been packing and prepping everything to go as soon as possible. As Kye (inventory manager) would say…
I’m glad that the saga is coming to an end. In hindsight, there could have been a couple of things we could have done and a few things we learned. One of them would have been to express ship a small batch from the original batch of parts to have them on hand as an emergency. Second would have been to get more visability on the status of the shipment. One of the problems was that on the system, it was showing that our stuff would be arriving on time, but that was because our operator was not updating the system. We needed to find info out about the shipments by calling or emailing directly. If we were aware of the delays earlier, we may have been able to react faster and make other arrangements.
Status of materials
Front and back feet
In our last update, we talked about parts that were expected to arrive on the week of March 7th. I’m happy to announce that these parts have now arrived and are being packed and assembled:
X, Y, Z gantries
Dust shoe brackets
Drag chain brackets
Dust shields
V-wheels
Cables
Assorted packaging
3D printer filament
Inductive sensors
Here are the parts that we are still waiting on:
Power supplies (1-3 weeks)
Dust shoe boxes (this week)
Rail boxes (this week)
Production and assembly
We’ve been making good headway into production and assembly, and materials needed to ship the first batch of machines that we have on hand have now been pre-packed.
Future lead times
Once container MAGU5348230 arrives, we will have 1500 or more units worth of components for the LongMill MK2 12×30 and 30×30 with some exceptions. The two major parts that will be our next bottlenecks are likely to be the aluminum extrusion and the steel parts (gantries, drag chain mounts, feet). Both the rails and steel parts were made at 500 units worth, so we can make tweaks to these parts after the first batch.
Even with delays, sales have continued to be strong. We currently have around 400 units accounted for, and are expecting 500 units sold in the next couple of weeks.
Currently, another batch of rails is expected to ship in early June for another 500 units. We may be looking at extending lead times once we sell the first 500 LongMills as we may be waiting for the next batch of rails to arrive. Almag has been good at getting things shipped out on time or early so there is a chance we might get these parts earlier.
Steel parts are now starting production. We’ve given the go-ahead for some parts that don’t need changes, but we are expecting to finish the tweaks this week. Nithside, our manufacturer for the steel parts has told us that they are shooting to finish the batch this time within 3 weeks, as they were able to streamline some of their processes during the last batch. Total turnaround time with cutting, forming, and coating is expected to be around 6 weeks.
Once we are a bit further into the production, we’ll update our pages with new lead times.
LaserBeam
I talked with Ikenna about the status of the pending LaserBeam orders. We were able to ship some once we had more power cables arrive, but we are now waiting on copper heatsinks and power adapters to arrive to complete the production. The parts that we need for shipping are in container MAGU5348230, so we are facing the same delays as the power supplies for the LongMills.
We are currently producing and stockpiling parts and assemblies for the driver enclosure and shields, and we also have received another batch of laser goggles, fans, and lenses to cover for the next batch.
LongMill MK2 48×30 and Extension Kits
We’ve now received the:
T12 lead screws
6001 Flange Bearings
T12 Delrin nuts
T12 ACME nuts
Longer drag chains
To get prepped for shipping, we still need to get:
Extension cables and wiring
Y gantry plates
MK1 to MK2 Delrin nut adapter
We just received our sample batch of extension cables. These will let our customers extend the length of the motor cables and inductive sensors. One they have been checked and tested, we’ll order a batch. We’ll also sell these on the store as extras so that customers can extend their cables if they need.
I’ve been using our 48×30 machine here and it’s been great! Currently, it’s just been used for general projects both large and small. Here’s a subwoofer box that I was working on for my car.
One thing I realized that was actually super handy about the 48in width was the fact that I didn’t need to cut any material down to fit the machine. All I did was put some half sheets of MDF that we had on hand, and just moved the mounting for the material down the middle, so I could just reposition the material to the area I wanted to cut.
I also put together a prototype machine for the MK1 to MK2 extension kits. At first I had a lot of issues with it, as it was getting stuck in travel, but it turned out that I had used a bad batch of prototype plates that had offset the bearing spacing by 3mm, causing the machine to bind. Replacing them has fixed the issue.
We are now starting to work with our beta testers to get the larger machines in their hands. The first two beta testers will receive their machines this week. Watch out for more news!


/cdn.vox-cdn.com/uploads/chorus_image/image/58545631/roundtable_elon_musk_flamethrower_apimages_ringer.0.jpg)


